Here is a bit different article about how software engineering in general got into my life when I was a teenager.
I think my first connection with computer science, or more specifically web development, was when I was about 10 years old (or even younger?), my father was working as a JAVA developer, and one of his colleagues in Switzerland had a homepage which was extremely simple: basically there was the name of his, some weather information about his hometown (as far as I remember) - AND (that's the most important part) a real time webcam!
"How was that real time?", you may ask, and is a very valid question.
Imagine we are in 1998, where weird browsers were popping up from every corner (without any standards, yikes!). So how could one implement a real-time webcam on a webpage?
The trick was that there was an image (which you could see as a real-time camera), which was refreshed every 10 or 20 seconds (so basically changing it's URL from JavaScript /or maybe it wasn't JS? not sure../).
That was so mindblowing for me, I couldn't really imagine I could build something like that even if I spent a whole lifetime learning it.
After that my next meeting with Computer Science was Comenius Logo. To be honest, I believe I was a very bad "programmer" back then since I thought "What is the point of this? Moving a turtle around the screen with an overly verbose way? That's just simply pointless.".
So I was not super motivated about Comenius Logo. I only remember the games which we were playing after school on Pentium 1-s (Outlaws multiplayer on LAN ftw!).
After that I basically tried myself as a "homepage developer" without knowing that I was doing any programming - since I only wrote HTML code without any coding involved. One could say it WAS programming, but I highly doubt that.
That was the time when I met MS Frontpage 2003.
So I built a homepage basically to share gaming photos about Warcraft 3 and GTA: Vice City. This homepage had a header (!), a footer (!) and also a sidebar (!!).
It was one of the best experiences developing it and uploading it via FTP to a free hosting service, which had a never disappearing ad banner at the top of every page. It was not that annoying by that time since I was like "WHOA! I have a webpage! Who cares about freaking ads?".
So yeah, that was it, after that I started to develop other very small webpages, and started to explore the world of the interwebz.
A mostly JavaScript blog about my experiences with the platform and the language. https://nagyadam2092.github.io/
Thursday, August 2, 2018
Saturday, June 2, 2018
Testing AWS Lambda function which uses S3 using Mocha and Sinon
I've been seeking through the interwebz to find a good tutorial on testing an AWS lambda function which uses it's S3 API, so here we go, this is my take on it.
The key idea behind it is to have a 4th default argument which is going to be a Sinon spy at the test, just to mock S3's behaviour. Here we go, there is the solution I came up:
Sunday, February 25, 2018
Spring framework
Although I'm working with Spring on a daily basis, sometimes it's good to revisit the basics of a framework / concept. So I did, and here are my notes. Cheers!
Objects are injected at runtime.
@Profile(“develop”) --- this anniotation makes sure to run that method.
e.g.: @Scope(“singleton”)
Dependency injection is achieved through @Autowired.
Setter Injection: inject at the setter method.
Constructor Injection: good practice, inject at the constructor. Class become immutable.
…
InventoryService inventoryService;
@Autowired
public OrderServiceImpl(InventoryService inventoryService) {
this.inventoryService = inventoryService;
}
@PreDestroy: method being run before destructor is called.
Applications:
In Spring AspectJ is handling the aspecting.
Parts of a Spring Aspect:
Configuring the Application Context
Inversion of Control
AKA Dependency InjectionObjects are injected at runtime.
Profiles
You can set profiles like develop or production to be able to branch the code.@Profile(“develop”) --- this anniotation makes sure to run that method.
Bean Scopes
- singleton: Scopes a single bean definition to a single object instance per Spring IoC container.
- prototype: Scopes a single bean definition to any number of object instances.
- request: Scopes a single bean definition to the lifecycle of a single HTTP request; that is each and every HTTP request will have its own instance of a bean created off the back of a single bean definition. Only valid in the context of a web-aware Spring ApplicationContext.
- session: Scopes a single bean definition to the lifecycle of a HTTP Session. Only valid in the context of a web-aware Spring ApplicationContext.
- global session: Scopes a single bean definition to the lifecycle of a global HTTP Session. Typically only valid when used in a portlet context. Only valid in the context of a web-aware Spring ApplicationContext.
e.g.: @Scope(“singleton”)
Proxies
Since Spring 4.0 every class which is loaded into the Bean Factory gets at least one Proxy.Annotation based configuration
@Component scan
This indicates that a class should be loaded to the bean factory.Dependency injection is achieved through @Autowired.
Autowiring
Field level: private attributes can be autowired, but not a good practice.Setter Injection: inject at the setter method.
Constructor Injection: good practice, inject at the constructor. Class become immutable.
…
InventoryService inventoryService;
@Autowired
public OrderServiceImpl(InventoryService inventoryService) {
this.inventoryService = inventoryService;
}
Lifecycle methods
@PostConstruct: method being run after constructor.@PreDestroy: method being run before destructor is called.
Bean lifecycle
Initialization phase:- Begins with creation of ApplicationContext
- BeanFactory initialization phase
- Bean initialization and instantiation
- Bean definitions loaded: from Java configuration, Bean configuration, Component scanning and aut configuration
- Post-process bean definitions: BeanFactory is loaded with references
- Instantiate Bean: Bean pointer is still referenced in Bean Factory, Objects have been constructed, BUT not available for use yet!
- Setters: beans are fully initialized; all initial dependencies are injected - beans still not ready for use
- Bean post-processor (pre- and post-init): almost the same as Initializer
- Initializer: @PostConstruct methods are called here; after the step beans are instantiated and initialized, dependencies have been injects, BEANS READY TO USE
Aspect Oriented Programming (AOP)
Aspects: reusable blocks of code that that are injected into your application during runtime.Applications:
- Logging
- Transactions
- Caching
- Security
In Spring AspectJ is handling the aspecting.
Parts of a Spring Aspect:
- Aspect: A modularization of a concern that cuts across multiple objects. Transaction management is a good example of a crosscutting concern in J2EE applications. In Spring AOP, aspects are implemented using regular classes (the schema-based approach) or regular classes annotated with the @Aspect annotation (@AspectJ style).
- Join point: A point during the execution of a program, such as the execution of a method or the handling of an exception. In Spring AOP, a join point always represents a method execution. Join point information is available in advice bodies by declaring a parameter of type org.aspectj.lang.JoinPoint.
- Advice: Action taken by an aspect at a particular join point. Different types of advice include "around," "before" and "after" advice. Advice types are discussed below. Many AOP frameworks, including Spring, model an advice as an interceptor, maintaining a chain of interceptors "around" the join point.
- Pointcut: A predicate that matches join points. Advice is associated with a pointcut expression and runs at any join point matched by the pointcut (for example, the execution of a method with a certain name). The concept of join points as matched by pointcut expressions is central to AOP: Spring uses the AspectJ pointcut language by default.
Tuesday, November 28, 2017
Udemy Docker notes
I was doing a course on Docker at Udemy ( https://www.udemy.com/docker-mastery/ ), here are my notes about it.
Kudos to Brett Fisher (https://twitter.com/bretfisher) who has done an amazing job creating this course. Thanks!
http://labs.play-with-docker.com
New command syntax
What does docker container start actually do?
Containers aren’t really VM-s: THEY ARE JUST PROCESSES
CLI process monitoring
Getting a shell inside a container
-it means: interactive (keeps session open to keep terminal input), -t pseudo-tty (simulates a real terminal, like what ssh does)
Docker networks
-p: exposing ports
BUT: you don’t have to expose all the time, you can create sub virtual networks which are going to “understand” and “see” each other, so you can just define a communication without exposing ports.
docker container inspect --format '{{ .NetworkSettings.IPAddress }}' webhost: just the IP . NEAT
Communicating with two virtual networks (subnetworks) is only able to do by going out to the exposed ports to the outside and communicate over there.
Docker network CLI
With docker swarm this is easier to do!
Docker container DNS
Docker daemon has a built-in DNS server that container use by default.
Note: IP-s are not good way to communicate, use names instead! Apps can fail and get new IP address, but it can fall back to a name with a different ID still!
Container images
What’s in an image:
Download an image from Docker Hub.
docker pull [OPTIONS] NAME[:TAG|@DIGEST]
Image layers
Persistent Data
Volumes
Persistent data for images.
docker volume ls
Bind Mounting
Maps a host file or directory to a container file or directory.
Basically just two locations pointing to the same file(s).
CAN’T USE IN DOCKERFILE, MUST BE IN container run .
That’s really good for development - binding local files to the containers
Docker-compose
You can use sub containers to communicate with each other. Neat!
docker compose up - this is starting all the containers which are defined in docker-compose.yml file.
With docker-compose you can manage a multi-container environment easily.
Docker swarm
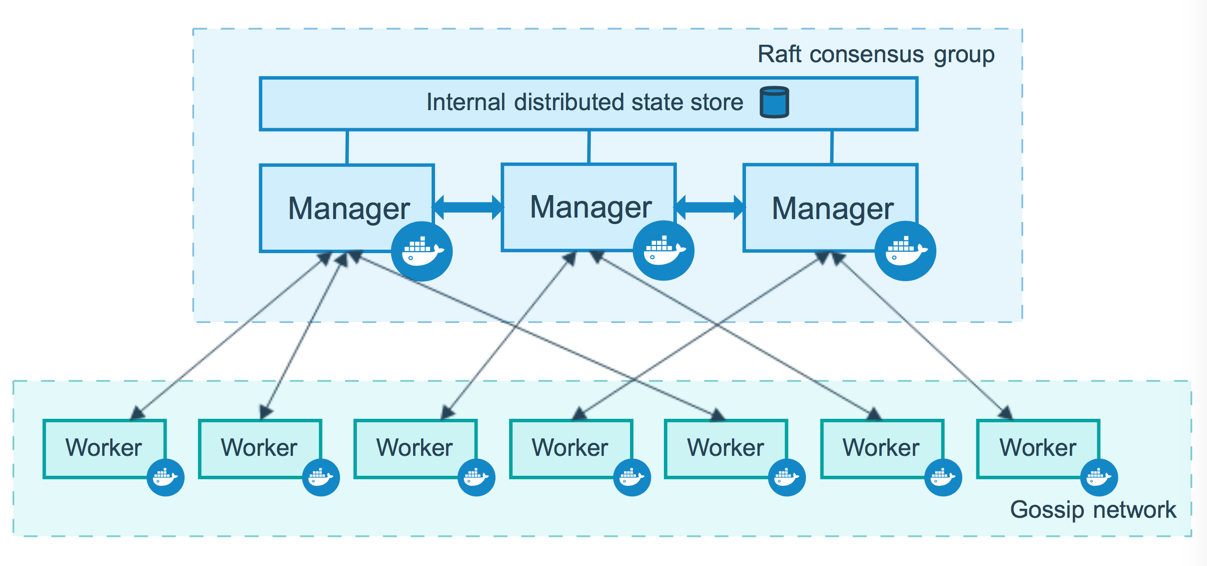
Server clustering solution.
Can orchestrate the lifecycle of your containers.
docker swarm init - enables swarm mode in an environment (so you can run your own swarm in your computer)
With the swarm API we are not directly communicating with containers, rather we are just communicating with the orchestration which will make sure the commands will be executed, and e.g. if a service dies, it will make sure it re-runs it!
Routing mesh
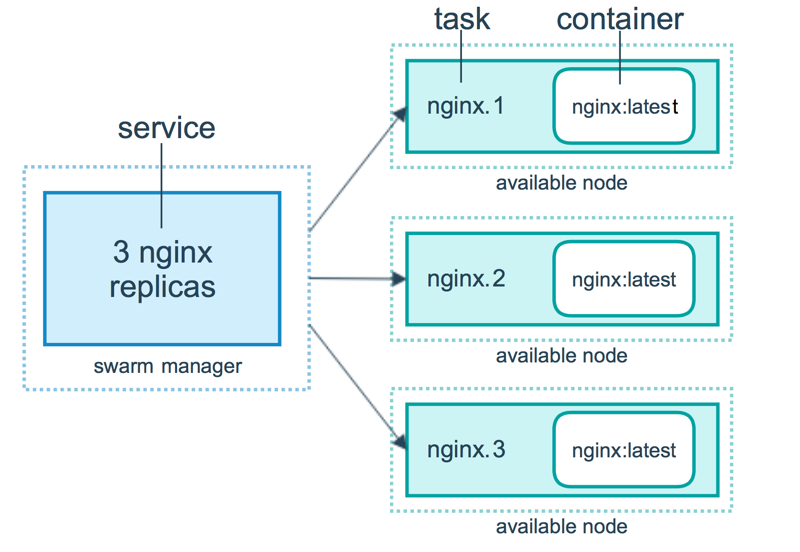
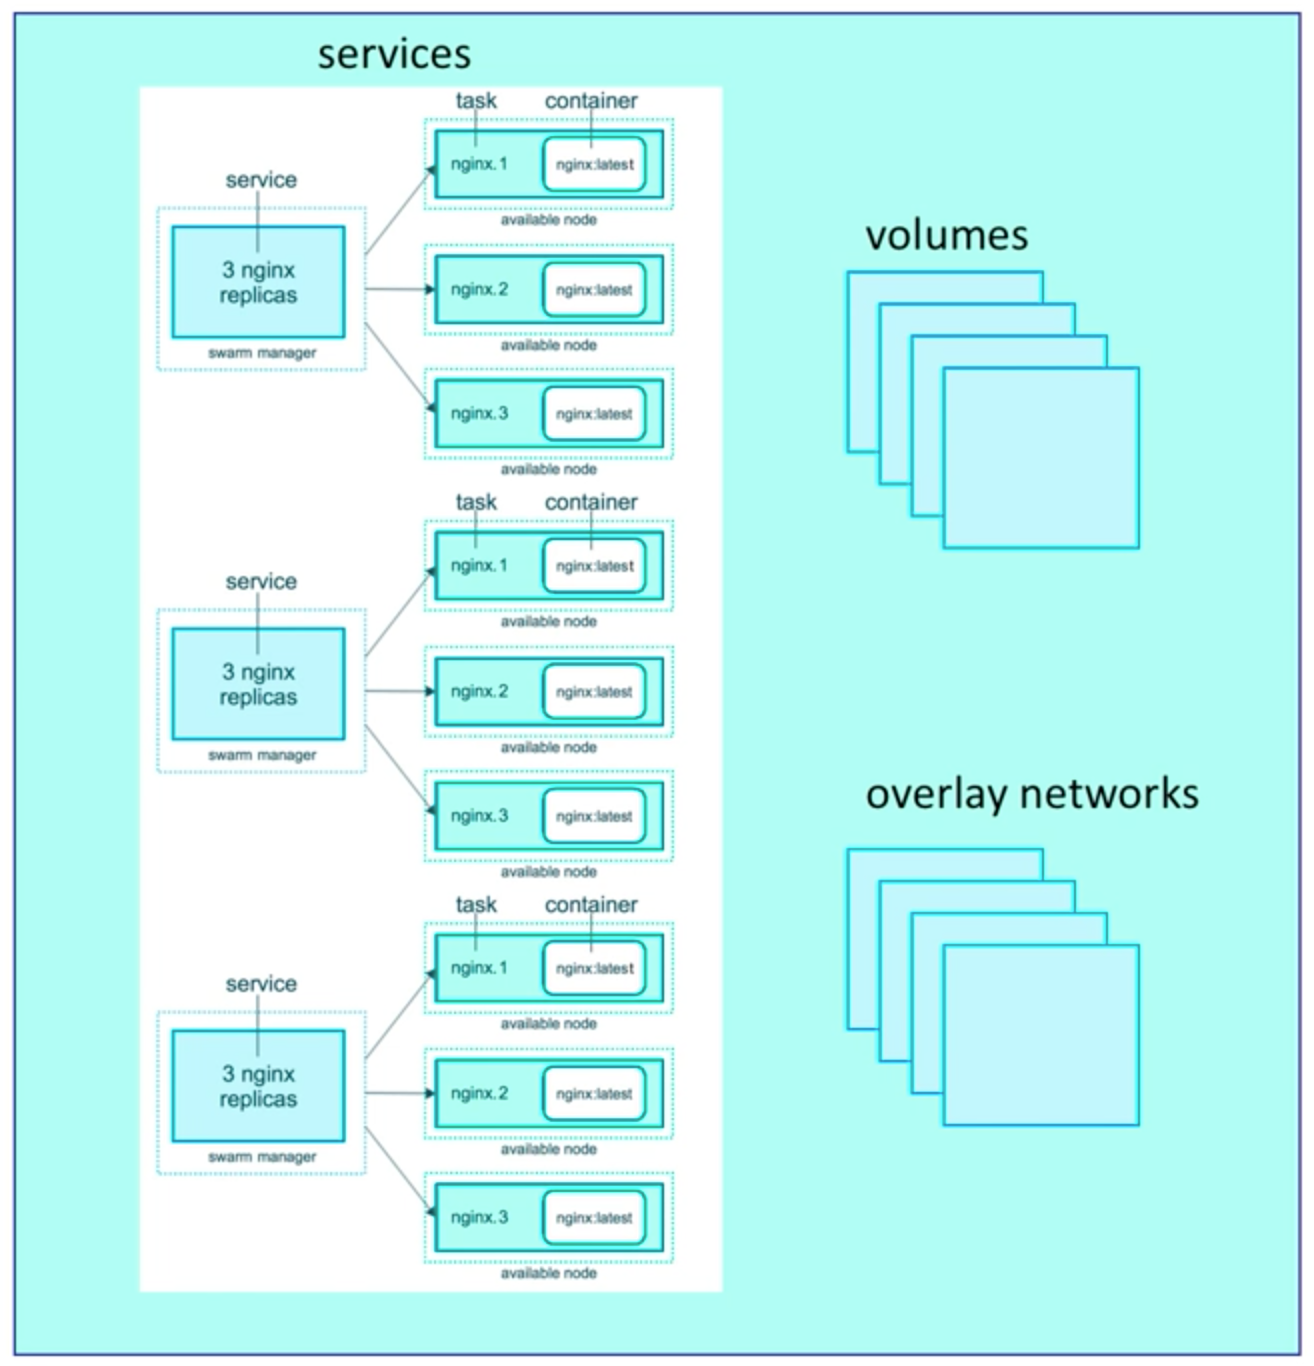
The routing mesh enables each node in the swarm to accept connections on published ports for any service running in the swarm, even if there’s no task running on the node. The routing mesh routes all incoming requests to published ports on available nodes to an active container.
Stacks
Basically compose files for swarms.
docker stack deploy
Docker compose ignores deploy and swarm ignores build. Separation of concerns.
docker-compose cli not needed on Swarm server!
1 stack → 1 swarm!
Secrets
Easiest “secure” solution for storing secrets in Swarm.
Secret:
SWARM & STACK & SECRETS are cool!
Kudos to Brett Fisher (https://twitter.com/bretfisher) who has done an amazing job creating this course. Thanks!
http://labs.play-with-docker.com
New command syntax
- docker container ls
- docker container ls -a
- docker container start
- …
What does docker container start actually do?
- Looks for the image in the image cache
- Then looks in remote hub (docker hub default)
- Downloads latest version
- Starts a new container based on that image
- Gives it a virtual IP !!INSIDE!! the docker engine on a private network
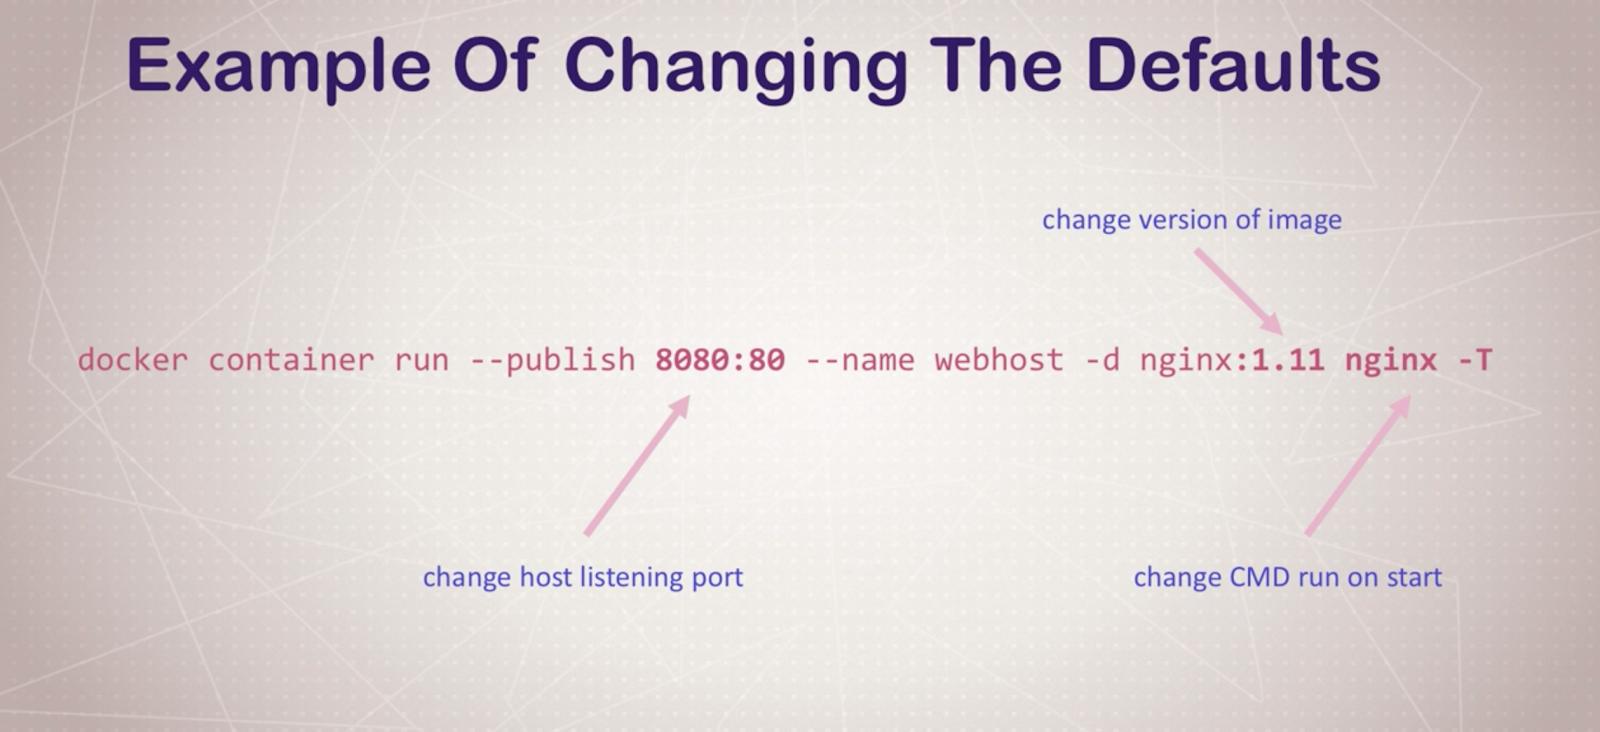
- Opens up port 80 on host and forwards to port 80 in container (with the --publish command)
- Starts container using the CMD in the image Dockerfile
Containers aren’t really VM-s: THEY ARE JUST PROCESSES
CLI process monitoring
- docker container top: list running processes in a specific container
- docker container inspect [ID/NAME]: gets metadata for that container (like volume, config, etc..
- docker container stats: shows live performance measures for all the containers running
Getting a shell inside a container
- docker container run -it: start new container interactively (with CLI, e.g. with bash)
- docker continer exect -it: run additional command in existing container (no ssh needed!!)
-it means: interactive (keeps session open to keep terminal input), -t pseudo-tty (simulates a real terminal, like what ssh does)
Docker networks
-p: exposing ports
BUT: you don’t have to expose all the time, you can create sub virtual networks which are going to “understand” and “see” each other, so you can just define a communication without exposing ports.
docker container inspect --format '{{ .NetworkSettings.IPAddress }}' webhost: just the IP . NEAT
Communicating with two virtual networks (subnetworks) is only able to do by going out to the exposed ports to the outside and communicate over there.
Docker network CLI
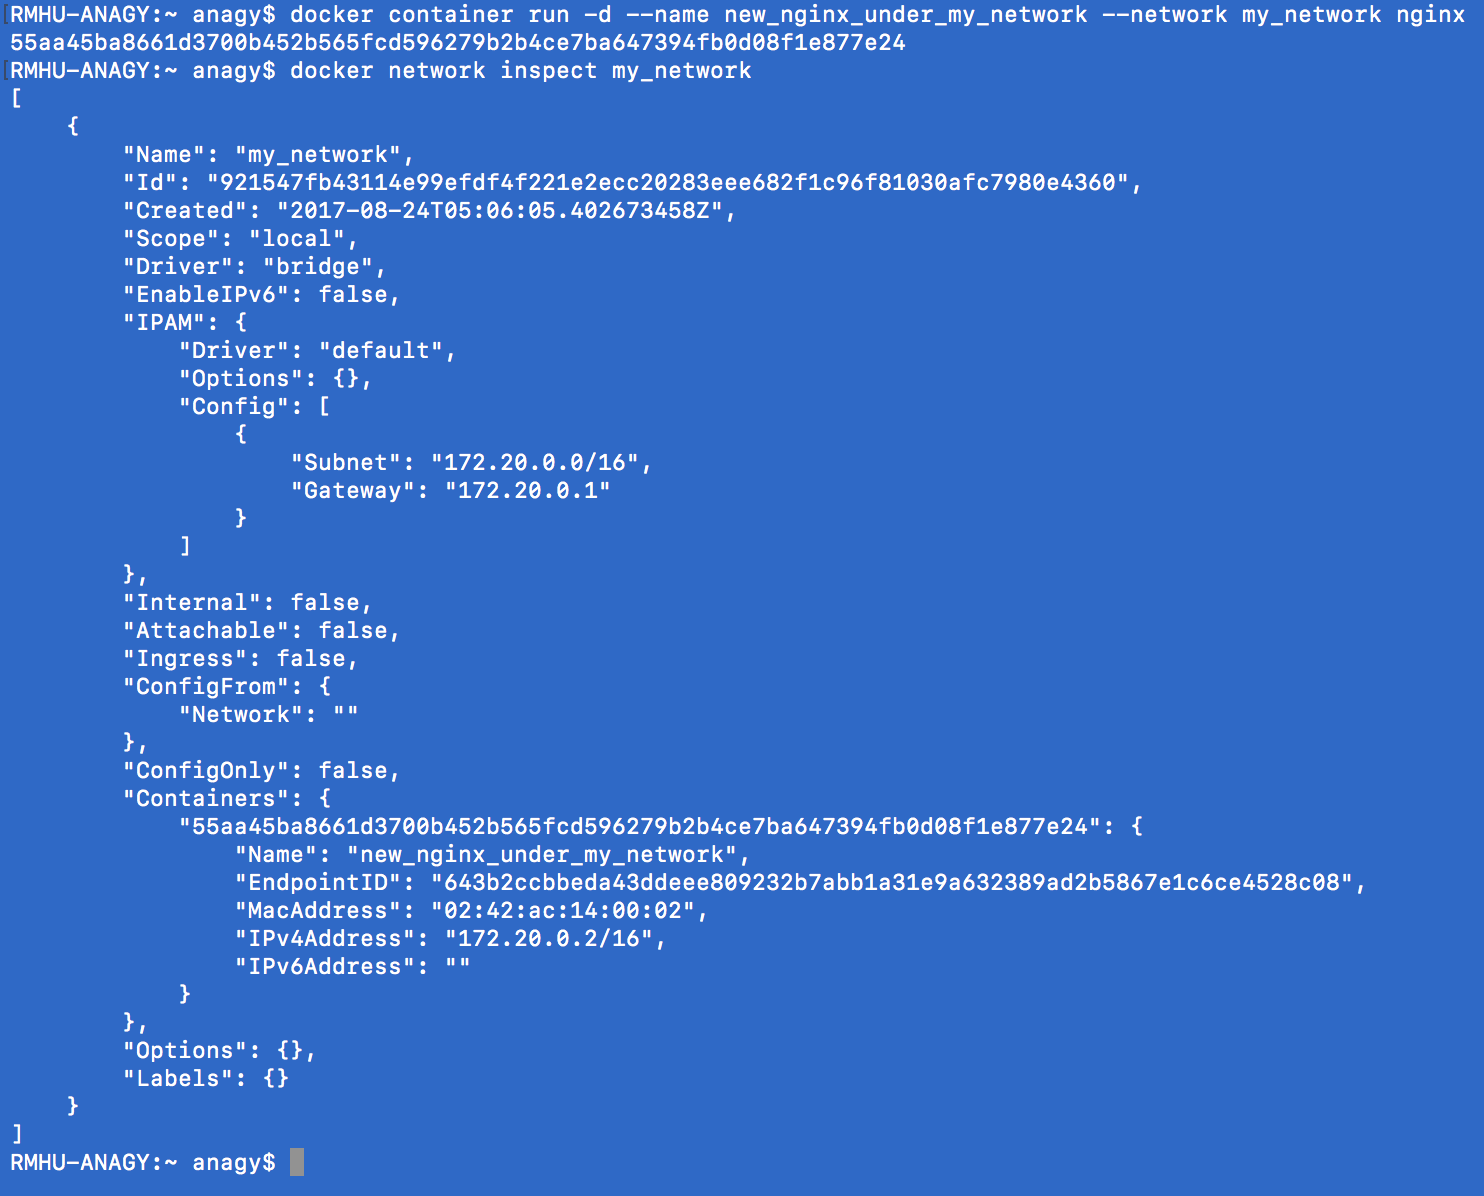
- docker network ls: networks
- docker network inspect: get metadata from a network
- docker network create --driver: creates a network
- docker network connect / disconnect
With docker swarm this is easier to do!
Docker container DNS
Docker daemon has a built-in DNS server that container use by default.
Note: IP-s are not good way to communicate, use names instead! Apps can fail and get new IP address, but it can fall back to a name with a different ID still!
Container images
What’s in an image:
- App binaries and dependencies
- Metadata about the image data and how to run the image
Download an image from Docker Hub.
docker pull [OPTIONS] NAME[:TAG|@DIGEST]
Image layers
- Image layers:
- docker image history nginx
- history of the image layers
- basically an image layer is a new command / change to the previous one, e.g. like the base image layer is ubuntu, and then apt-get -ing something (like mysql), and that’s going to be the next image layer
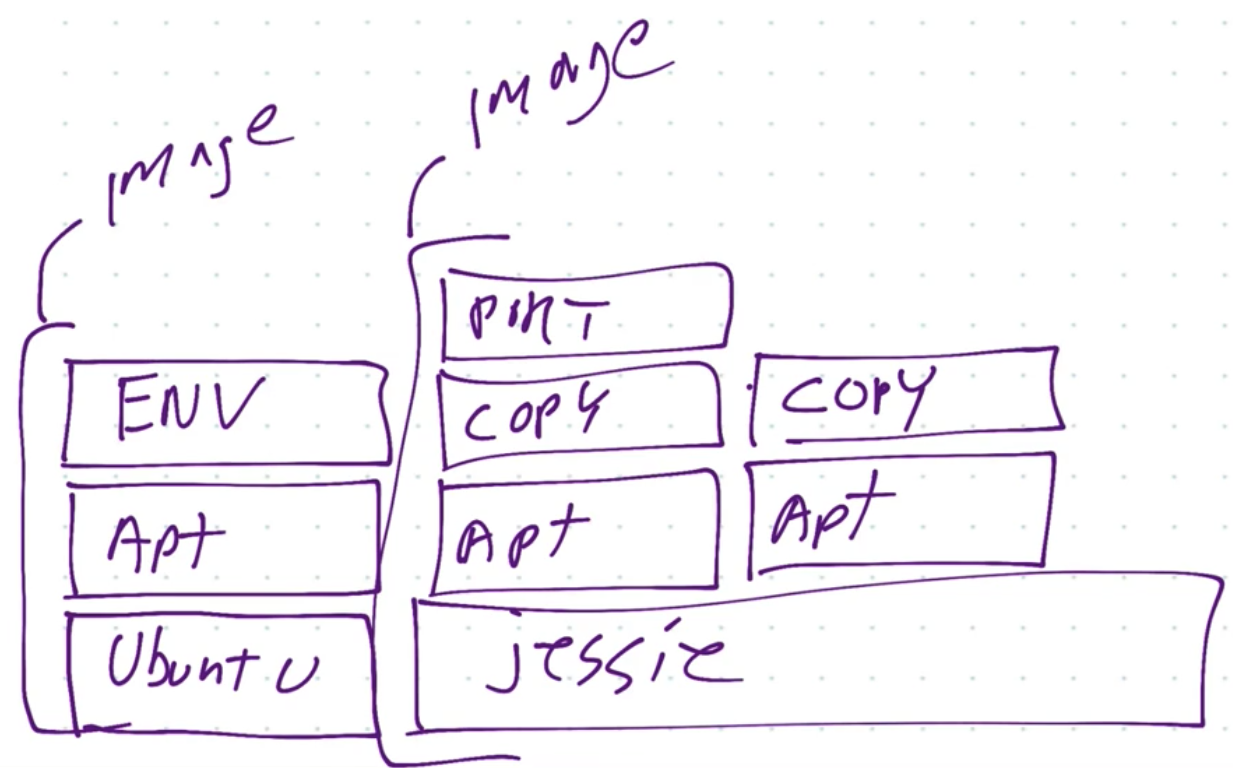
- On the picture above you can see how caching is done: if 2 images are using jessie image layer, it is not going to be dupicated, both images will use the same jessie image (layer)
- Image layers are saved and basically attahed together for an image (so it can save space)
- docker image inspect nginx
- Image tagging and pushing to docker hub
- a very similar process like git
- Dockerfile
- instructions how to build our image
- FROM: which is the starting image
- ENV: set environment variable
- RUN: run commands
- EXPOSE: expose port (you still have to run -p if you would like to expose this to the outside) - so basically I am ALLOWING the image to be exposed, but I still have to do it explicitly!
- CMD: run a command when container is run
- General best practice: keep the less changing things on the top of the Dockerfile and and the more changing at the bottom
Persistent Data
Volumes
Persistent data for images.
docker volume ls
Bind Mounting
Maps a host file or directory to a container file or directory.
Basically just two locations pointing to the same file(s).
CAN’T USE IN DOCKERFILE, MUST BE IN container run .
That’s really good for development - binding local files to the containers
Docker-compose
You can use sub containers to communicate with each other. Neat!
docker compose up - this is starting all the containers which are defined in docker-compose.yml file.
With docker-compose you can manage a multi-container environment easily.
Docker swarm
Server clustering solution.
Can orchestrate the lifecycle of your containers.
docker swarm init - enables swarm mode in an environment (so you can run your own swarm in your computer)
With the swarm API we are not directly communicating with containers, rather we are just communicating with the orchestration which will make sure the commands will be executed, and e.g. if a service dies, it will make sure it re-runs it!
Routing mesh
The routing mesh enables each node in the swarm to accept connections on published ports for any service running in the swarm, even if there’s no task running on the node. The routing mesh routes all incoming requests to published ports on available nodes to an active container.
Stacks
Basically compose files for swarms.
docker stack deploy
Docker compose ignores deploy and swarm ignores build. Separation of concerns.
docker-compose cli not needed on Swarm server!
1 stack → 1 swarm!
Secrets
Easiest “secure” solution for storing secrets in Swarm.
Secret:
- usernames, passwords
- TLS certificates and keys
- SSH keys
- Any data you would prefer not be “on front page of news”
SWARM & STACK & SECRETS are cool!
Labels:
docker,
docker compose,
docker swarm,
notes,
udemy
Saturday, September 30, 2017
React portals!
React 16 is here!
This new version is extremely interesting not just because it has some new cool features, but it's a complete rewrite from the start!
It's fascinating how well TDD (Test Driven Development) can work in real-lief, huge projects like React itself, since the aim was to create the new React while fixing all the tests that the "old" React had. And they did it! Step by step, day by day, with hard work, but they did it. And even new features! Kudos to the React team and especially Dan Abramov!
There are few new features like:
This new version is extremely interesting not just because it has some new cool features, but it's a complete rewrite from the start!
It's fascinating how well TDD (Test Driven Development) can work in real-lief, huge projects like React itself, since the aim was to create the new React while fixing all the tests that the "old" React had. And they did it! Step by step, day by day, with hard work, but they did it. And even new features! Kudos to the React team and especially Dan Abramov!
There are few new features like:
- fragments and string: basically don't have to return one single elemnt in render
- better error handling: the new <ErrorBoundary><MyComponenentWhichCouldError /></ErrorBoundary> component which "polyfills" the wrapped component with a new lifecycle method called componentDidCatch which works like a catch{..} in JS
- Portals: later in this article
- Better server side rendering: for me this is not a big change since I haven't really used SSR :P
- Support fro custom DOM attributes: unrecognized React HTML and SVG elements are passed through the DOM now
- Reduced file size
- MIT license
- New core architecture(Fiber): featuring async rendering which is basically a two step rendering mechanism with a commit and render phase. Here is a demo: https://build-mbfootjxoo.now.sh/ -- mind the square in the top right corner!
Let's talk a bit more about portals.
These are meant to solve out of the parent component communication, which could be done before but it was a bit hacky.
Now we can define a component which is going to refer to a DOM component which is not is not under the parent component (basically out of the current component's reach). This component is going to use a portal to refer to a DOM component.
Now we can use the component defined above in another React component without even knowing it's using porals! Neat!
Here is an example based on this pen. Mind that there is a component which is using a portal (Modal) and the other one (App) does not know Modal is using portals, and it is using it.
Labels:
16,
componentdidcatch,
errorboundary,
fiber,
portal,
react
Sunday, September 10, 2017
React beginner assignment
Sometimes I do computer science teaching and get stuck how to do it properly. I like to give a small theoretical sum of what a lesson is about but then immedately give an exercise where the candidate can try out the new concepts.
This time I was asked to give lessons on React and I thought the best way would be to give an assignment which will test whether the student understood the core concepts of it. So here is the assignment (and here is a solution: https://stackblitz.com/edit/react-assignment-nr-1-solution)
There is an App component which stands for the wrapper of the component and 4 other (child) components:
In summary:
This time I was asked to give lessons on React and I thought the best way would be to give an assignment which will test whether the student understood the core concepts of it. So here is the assignment (and here is a solution: https://stackblitz.com/edit/react-assignment-nr-1-solution)
There is an App component which stands for the wrapper of the component and 4 other (child) components:
In summary:
- App component: in it's state it has an appState which is initially 1 but it can be increased with a button.
- CompOne component: waits for an appState prop, displays it, plus it has it's own state: compOneState which you could edit with a textinput (more info: https://facebook.github.io/react/docs/forms.html#controlled-components)
- CompTwo: almost the same as CompOne: awaits for appState prop, displays it, and it also has it's own state: compTwoState which is initialized by 1 and it could be increased with a button.
- CompFour: only props are required: appState, compOneState which it displays
- CompThree: almost the same as CompFour - only props: appState and compTwoState, displays is.
Pseudo code:
<App>
<CompOne>
<CompFour /><CompFour />
</CompOne>
<CompTwo>
<CompThree />
<CompFour />
</CompTwo>
</App>
- App: red border
- CompOne: blue border
- CompTwo: green border
- CompThree: black border
- CompFour: grey border
Thursday, July 6, 2017
Understanding JWT
Using JWT-s is a widely accepted way of authentication.
The reason why JWT-s are used is to prove that the sent data was actually created by an authentic source.
This means the client will get this token which is signed somehow with a secret (stay tuned) and with that the server can trust that client that it is already authenticated without having to handle sessions in memory.
It's very important to mention that the purpose is not to hide data! Let me show you this through an example.
The reason why JWT-s are used is to prove that the sent data was actually created by an authentic source.
This means the client will get this token which is signed somehow with a secret (stay tuned) and with that the server can trust that client that it is already authenticated without having to handle sessions in memory.
It's very important to mention that the purpose is not to hide data! Let me show you this through an example.
Autopsy of a token
I would like to give a try for another approach by explaining how JWT-s work and it is by using an existing example and analysing it.
Let's have a token:
eyJhbGciOiJIUzI1NiIsInR5cCI6IkpXVCJ9.eyJpc3MiOiJleGFtcGxlLmNvbSIsInN1YiI6ImFkbWluIiwiZ3JwIjpbImFkbWluIiwidXNlcnMiXSwiYWRtaW4iOnRydWUsImF1ZCI6ImV4YW1wbGUiLCJleHAiOjE1MTQ3NjQ4MDAsImlhdCI6MTQ5OTI2NDQ4NX0.w1Ls_fdotl3SdqFp2GcadSzc8a5Po77qeIUgknZ0X78
Separate them by the character "." and we have three parts.
The first one is the "Header". It is encoded via Base64, which you can decode via your browser for example.
Try it in your console: atob("eyJhbGciOiJIUzI1NiIsInR5cCI6IkpXVCJ9")
This is going to return {"alg":"HS256","typ":"JWT"} , which stands for
- typ: the type of the token which is JWT
- alg: the hash algorithm which is going to produce a signature for the header and the payload
The key part here is that this is not even signed, you can read it anytime! You just need to decode the Base64 string via e.g. your browser or however you would like to.
The middle part is the Payload. Similarly you can decode it by calling
atob("eyJpc3MiOiJleGFtcGxlLmNvbSIsInN1YiI6ImFkbWluIiwiZ3JwIjpbImFkbWluIiwidXNlcnMiXSwiYWRtaW4iOnRydWUsImF1ZCI6ImV4YW1wbGUiLCJleHAiOjE1MTQ3NjQ4MDAsImlhdCI6MTQ5OTI2NDQ4NX0")
which stands for:
{"iss":"example.com","sub":"admin","grp":["admin","users"],"admin":true,"aud":"example","exp":1514764800,"iat":1499264485}
BOOM! Nothing fancy, just decoding some Base64 string, that's it!
These keys are mainly standing for who you are and when this token will be expired, but you can check out more here: https://self-issued.info/docs/draft-ietf-oauth-json-web-token.html#rfc.section.4.1.6
The last part is the signature itself. NOW comes the interesting part.
The plan is the following how we can create a signature:
- First you need a secret which is a string. In our case it is "That's a secret."
- Then you'll need to Base64 encode your Header and Payload (remember, these are JSON strings!) - let's call them B64Header and B64Payload from now on.
- After that you can sign these by passing two arguments for the chosen hashing algorithm (HS256 in this case)
- The first argument is a string which looks like this: B64Header + "." + B64Payload
- The second argument is the secret.
- And the hashing algorithm returns then the signiture, which is going to be the last part of the token. Easy!
To make sure you understood everything visit https://jwt.io/ and try the token I provided in this article and make sure it's signed correctly (so it is a valid signature!)
Cheers!
Subscribe to:
Posts (Atom)